
Contents
- Introduction
- Overview of the link
- Configuring the Link
- Understanding Workflow
- Walkthroughs
- Link to an Existing QB Customer
- Create a new QB Customer from an ACT! Record
- Update a QB Customer from ACT!
- Create an Estimate, Sales Order or Invoice in ACT!
- Create an Invoice from an Estimate
- Create an Invoice from an ACT! Opportunity
- Create an Invoice from a Time & Billing Ticket
- Create an Invoice from Customer Sales History
- Generate a Document from an Existing Sales Item
- Attach a Transaction to ACT! History
- Monitor & Set an Alarm on Stock Levels
- View/edit credit card details (USA & CA only)
Related Documents
Xact Link for ACT! and QuickBooks User Manual
Walkthroughs
This section provides a list of walkthroughs showing how to perform a number of key functions provided by the link. If you are new to the link it is advisable that you do these walkthroughs using the ACT! demo database and the QuickBooks sample company file.
Link an ACT! Contact to an existing QuickBooks Customer
- Lookup the ACT! record you wish to link.
-
In the QuickBooks tab click “Linked to” and follow the wizard.
-
Either search for the contact you want to link or select Show all contacts to display all contacts from QuickBooks.
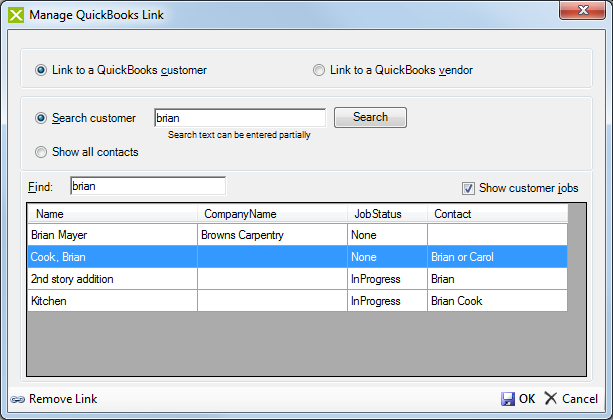
- Once you have selected the contact you want to link to, click next and close the wizard.
Note: Linking a contact does not change or update the customer record in QuickBooks or vice versa.
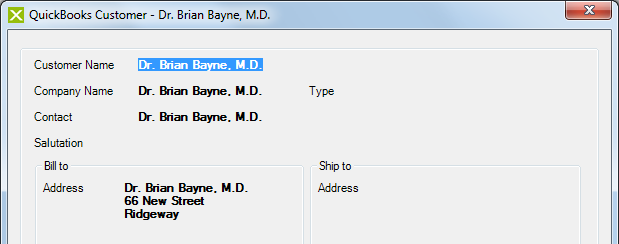
Create a new QuickBooks Customer from an ACT! Record
Creating new contact in Xero can be done individually or in bulk. To export multiple contacts at once run the export wizard.
To create a new contact in QuickBooks individually:
- Create a new ACT! contact or use an existing ACT! contact which is not currently linked.
- In the Xero tab, click the “Create QuickBooks Customer” button.
- Click “yes” to confirm.
Once this information has been confirmed the new customer card will be created and automatically linked to the current ACT! contact record.
Update a QuickBooks Customer from ACT!
- Navigate to the contact you want to update.
- Update the contact details in ACT!
- Click on the “Update QuickBooks Customer” button.
- Follow the update wizard and exit when complete.
To see the updated changes click on the “View Customer Details” button.
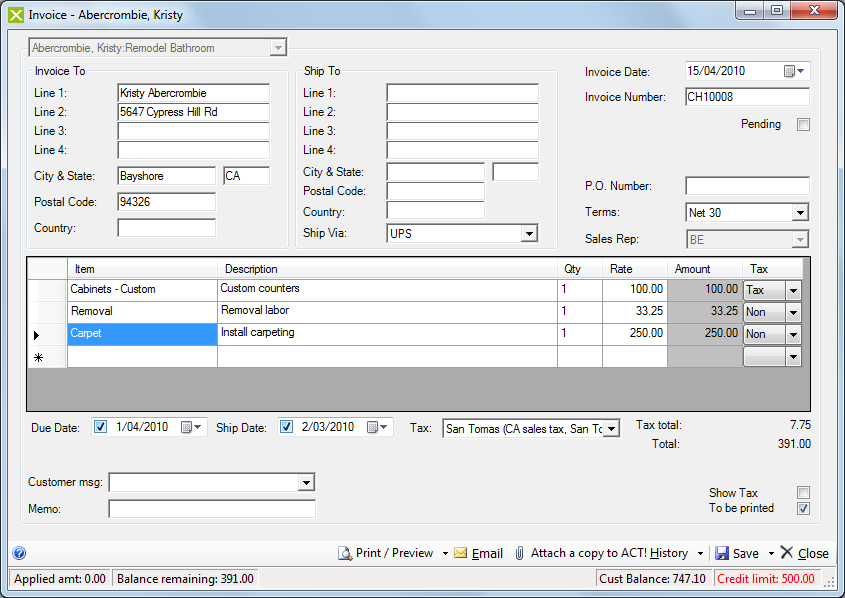
Create an Estimate, Sales Order or Invoice
- Choose a linked ACT! contact record.
- Navigate to the tab of the sale document (type) you want to create
-
Click on the “New Invoice” (or similar) button, a blank sales document will display.
-
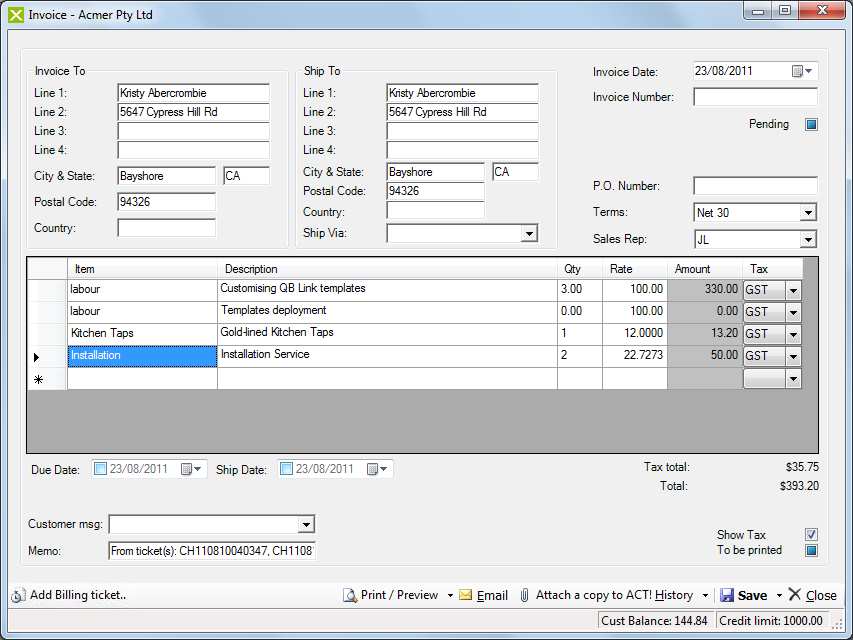
Fill in the details as if you were working in QuickBooks.
-
After entering all the details you can choose to print, email, attach to history and/or save the document.
Note: To delete an invoice line, click the row header and hit the "delete" kwy on your keyboard.
Create an Invoice from an ACT! Opportunity
Before you can integrate the QuickBooks Link with ACT! Opportunities you must import your QuickBooks products list into ACT!
Details on how to do this is found in the “Getting Started” section of this manual.
- Create a new ACT! opportunity or select an existing opportunity.
- Ensure that all of the correct products have been added to the “Products/Services” Tab.
- Navigate to the contact record associated with the opportunity and go to the “QuickBooks” Tab .
- If the contact is not linked to a QuickBooks customer link it or create a new QuickBooks customer.
-
Hover your mouse over the “New Invoice” button to display additional options.
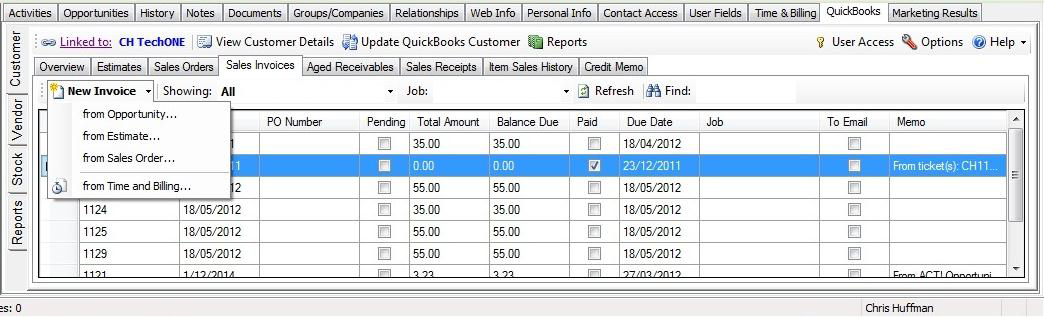
-
Click on the option to create a new invoice “from Opportunity…”
-
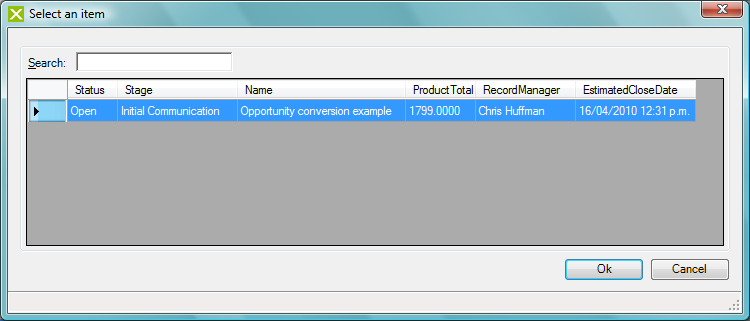
Select the opportunity you want to convert and click Ok. The link will create an invoice using the information from the opportunity; you can make any adjustments you want to the invoice prior to posting it to your accounting system.
-
Upon posting the invoice you’ll be asked whether you want to update the opportunity status to Won.
Note: Opportunity conversion is not limited to Invoices, other transaction types can also be created from an Opportunity.
Create an Invoice from an Estimate
As in QuickBooks, the Link also features the creation of an invoice from an existing estimate. Other conversions are also possible for example raising a sales order from an estimate.
- Choose a linked ACT! contact record.
- Navigate to the tab of the sale document you want to convert
- Right click the sales document you want to convert and select “Create Invoice”. A new invoice form will appear with all of the details copied from the estimate.
Create an Invoice from a Time & Billing Ticket
To raise an invoice from one or more Time and Billing tickets, the integration option must be enabled and configured. Refer to the Installation Guide for more information.
- Navigate to the contact you wish to bill.
- In the QuickBooks tab, hover your mouse over the “New Invoice” button to show the additional options.
- Select the “from Time & Billing” option.
-
Choose which Time & Billing ticket/s you wish to invoice.
Note: Only unbilled-completed tickets can be invoiced, Time & Billing tickets with any other status will not be displayed here. -
A new invoice form will be displayed with invoice lines automatically populated from the ticket(s) details.
Time & Billing tickets can also be added to existing invoices by simply clicking on the “Add Billing Ticket” button in the invoice form.
Note: The billable time description can be customized to pick up different fields from the ticket record, e.g. the ticket's "Regarding" field or "Result" field.
Create an Invoice from Customer Sales History
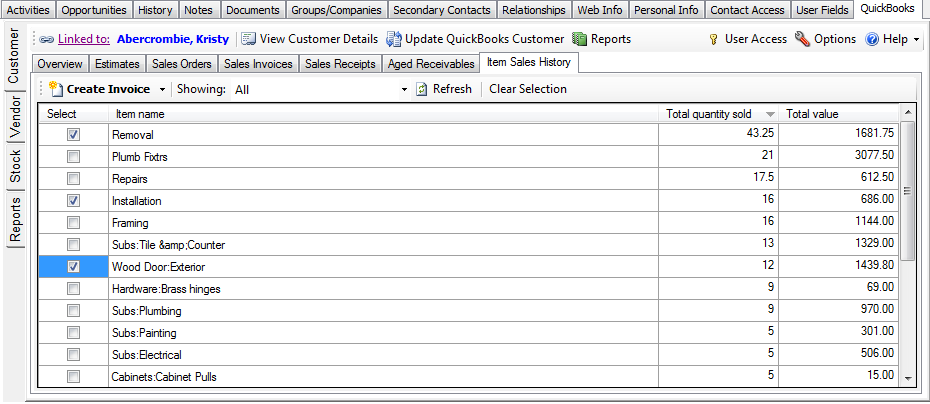
- Navigate to the contact you wish create an invoice for
- In the “Item Sales History” tab select the items you want to add to the invoice and click on the “Create Invoice” button.
Note: Clicking on the arrow next to the “New Invoice” button will display more transaction types.
Generate a Document from an Existing Sales Item
- Go to a currently linked ACT! record, click on the QuickBooks tab, choose a sales document and double click on it to view its details.
- Choose whether you want to Print, Email or attach the document to ACT! History.
The link will then perform the selected option using the appropriate template.
Attach a transaction to ACT! History
The link uses an HTML template to create a PDF copy of an existing transaction. Be aware however, this template is separate from the invoice template in QuickBooks.
This template can be customized, see Customizing the Template section for more information.
To attach a PDF copy of an invoice to ACT history, open the transaction and Click "Attach a copy to ACT! History"
Monitor and Set an Alarm on Stock Levels
The Stock module shows your entire inventory list including all Inventory Parts and Inventory Assembly in QuickBooks.
Yellow items indicate low quantity (below reorder/build point); Red items indicate out-of-stock (less or equal to zero); Green items are items on order (vendor purchase order) and un-shaded items are in stock.
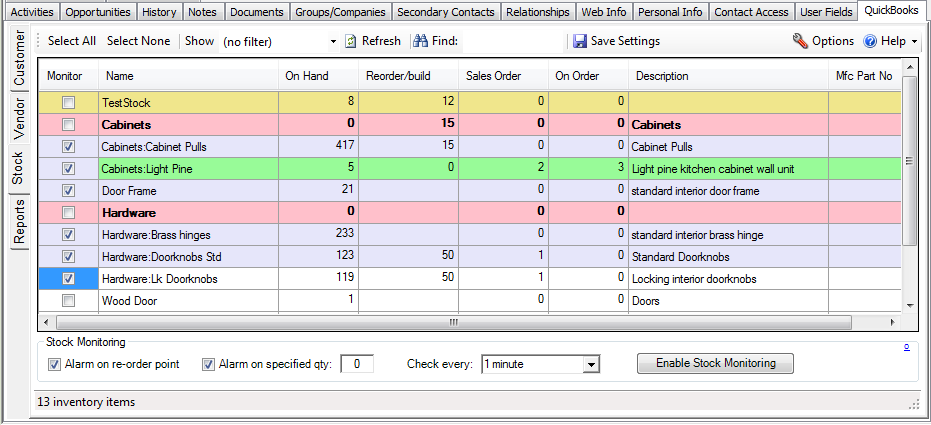
To set up automatic monitoring:
- Navigate to any contact that is linked to QuickBooks and go to the “Stock” module
- Select the items you want to monitor
- Choose how you want the alarm to be raised i.e. on re-order point or when it reaches a specific quantity
- Set the stock checking interval (by default this is set to every 1 minute)
- Click “Enable Stock Monitoring” to start.
The following warning will appear when one or more stock item reaches its specified trigger:
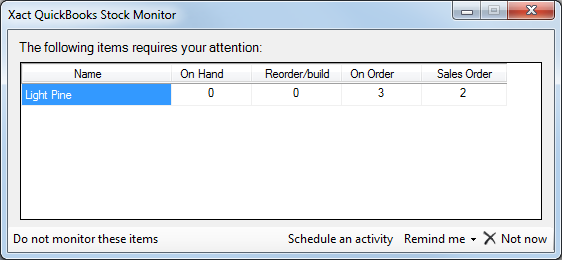
From here you have a number of options:
- Choose to stop monitoring these items
- Schedule a new ACT! activity
- Set the alarm to remind you again in the future
- Ignore the alarm
Note: The alarm notification can only run when ACT! is running.
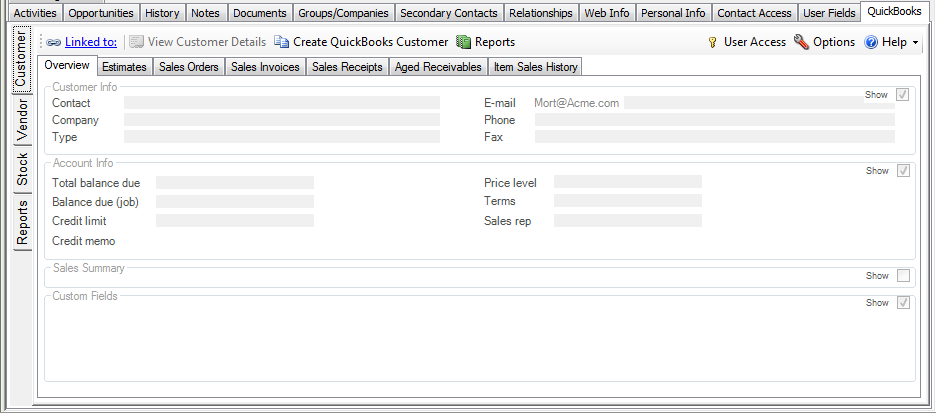
View/edit credit card details (USA & CA only)
To view or update a customers credit card details simply go to the Overview tab and click on the customers credit card number.