
Contents
- Introduction
- Overview of the link
- Configuring the Link
- Understanding Workflow
- Walkthroughs
- Link to an Existing QB Customer
- Create a new QB Customer from an ACT! Record
- Update a QB Customer from ACT!
- Create an Estimate, Sales Order or Invoice in ACT!
- Create an Invoice from an Estimate
- Create an Invoice from an ACT! Opportunity
- Create an Invoice from a Time & Billing Ticket
- Create an Invoice from Customer Sales History
- Generate a Document from an Existing Sales Item
- Attach a Transaction to ACT! History
- Monitor & Set an Alarm on Stock Levels
- View/edit credit card details (USA & CA only)
Related Documents
Xact Link for ACT! and QuickBooks User Manual
Customizing Templates
The Xact Link for QuickBooks supports converting invoices to PDF format for printing, attaching to ACT! History, or saving against the ACT! documents tab.
The Xact Link for ACT! and QuickBooks supports the use of HTML document templates and provides various settings including the ability to create templates for each transaction type, a simple WYSIWYG and HTML editor and Quick Customisation options.
You may require some knowledge of HTML to customise your templates.
The link provides a number of default templates. These files are usually located in “[Program Files]\ACT\ACT for Windows\Plugins\Xact_QB_Data”
You can use the sample templates or build your own. Alternatively you can contact your ACT consultant to assist you in creating new templates.
To edit the templates from within the QuickBooks link open the settings window and navigate to the “Template” tab. Next, click on the radio button of the sales document you want to modify, double-check that the correct file is referenced (or browse for the correct template) and click on the “View/Edit” button.
From here you can edit the main template using an HTML editor and modify how the transaction columns are displayed using a WYSIWYG (what you see is what you get) editor.
WYSIWYG Editor
To customise how the template columns appear simply click on the “Customise Columns” button. This will bring up a WYSIWYG editor.
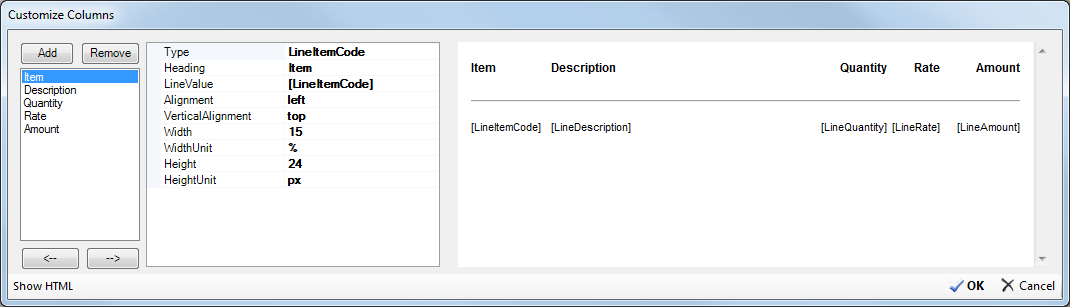
The panel on the left displays all of the available columns, the panel in the middle defines how that column is displayed in the template, and the panel on the right shows a preview of the transaction columns.
To add or remove a column simply highlight it in the left panel and click on the “add” or “remove” button. To change the order of the columns simply click on the arrows at the bottom of the left panel.
To edit a column, click the column name on the list and modify it’s properties on grid:
- Type: This indicates the field contained in this column (e.g. item, quantity, rate, etc)
- Heading: Specify the column heading
- LineValue: Depending on the Type specified above, line value shows the merge field for that type. Additional prefix or suffix can be added before or after the merge field, for example to show dollar sign to a line amount: “$[LineAmount]” (See Manual Transaction Line Template section below for a list of merge fields).
- Alignment: Specify text alignment (left/right/center)
- VerticalAlignment: Specify where the text displayed on the grid-cell (top/middle/center) especially when a transaction line contains multiple description lines.
- Width: Width of the column
- WidthUnit: Specify the unit for the Width value above. Common values are: %, in, cm, pt, px
- Height: Specify the minimum line height
- HeightUnit: Specify the unit for the Height value above. Common values are %, in, cm, pt, px
Note: For more information on units refer to www.w3schools.com
HTML Editor
To make any additional modifications to your template you will need to use an HTML editor. The link provides a basic editor which you can access by clicking on the “Edit” button from the main “View/Edit” screen.
When modifying these templates HTML data can be inserted from QuickBooks Sales Documents and from ACT! into the document using merge tags.
To insert a merge field from the ACT! contact entity simply enclose the field name in double curly brackets, for example you can add the company name field to a template like this:
For the QuickBooks sales documents you can insert any of the merge fields on the next page, the format of these fields is simply the field name encased in double square brackets. These fields are case sensitive.
Note: Some merge fields are only applicable to certain types of transactions.
Merge Fields
|
Field |
Description |
|---|---|
|
[SaleType] |
Type of sale: Estimate, Sales Order, Invoice, Sales Receipt, or Purchase Order |
|
[ContactName] |
QuickBooks customer name |
|
[Company] |
QuickBooks customer company name |
| [MyCompany] |
My record’s company name in ACT! |
| [BillAddress] |
The customer’s billing address as shown on the transaction record, excluding country |
|
[BillCountry] |
The customer’s billing country |
|
[ShipAddress] |
The customer’s shipping address as shown on the transaction record, excluding country |
|
[ShipCountry] |
The customer’s shipping country |
|
[VendorAddress] |
Vendor/supplier address (PO only) |
|
[VendorCountry] |
Vendor/supplier country (PO only) |
|
[TransactionNumber] |
The estimate, sales order, invoice, or sales receipt number |
|
[Date] |
The transaction date |
|
[DueDate] |
The transaction payment due date |
|
[ShipDate] |
The transaction ship date |
|
[ShipMethod] |
Ship method (via) |
|
[CustomerPO] |
Customer’s Purchase Order number |
|
[SalesRep] |
Sales representative code |
|
[Terms] |
Sale payment terms |
|
[TaxTotal] |
Tax amount total for this transaction |
|
[Subtotal] |
Lines amount total less tax amount |
|
[Total] |
The transaction total amount |
|
[AppliedAmount] |
Amount applied/paid to this invoice (INV only) |
|
[BalanceRemaining] |
Amount to be paid (INV only) |
|
[CustomerMessage] |
Any comments associated with the sale |
|
[Memo] |
The memo note associated with the sale. |
|
[SalesOrderStatus] |
Displays “FULLY INVOICED” or “CLOSED” or blank if neither |
|
[InvoiceStatus] |
Displays “PENDING” or “PAID” or blank if neither |
|
[TransactionLines] |
Customisable transaction lines (see Customising Template Columns) |
|
[LinkedTxnDate] |
Linked transaction date |
|
[LinkedTxnNumber] |
Linked transaction reference number |
|
[LinkedTxnAmount] |
Linked transaction amount |
| [Contact:<contact field name>] |
Insert value from current contact’s field. E.g. [Contact:User 1] produces the value of User 1 field of the current contact in ACT!. |
| [MyRecord:<contact field name>] |
Insert value from My Record contact’s field E.g. [MyRecord:Salutation] produces my record’s salutation |
To ensure that the transaction columns appear you can either use the [TransationLines] merge-field and modify using the WYSIWYG editor, or manually create the Transaction Line columns using the following merge fields:
|
Field |
Description |
|---|---|
|
[LineItem] |
Item full name |
|
[LineItemCode] |
Item code only |
|
[LineDescription] |
Item description |
|
[LineQuantity] |
Item quantity |
|
[LineRate] |
Item unit price |
|
[LineAmount] |
Transaction line amount |
|
[LineTaxCode] |
Transaction line tax code |
|
[QBItemCustomField:<QB custom field name>] |
Insert value from QuickBooks item custom-field
E.g. [QBItemCustomField:Color] produces the value from item’s custom field named “Color”
|
Note: Merge fields for transaction line items in the HTML file must be enclosed with
<!—-InvoiceLineBegin--> and <!—-InvoiceLineEnd--> tags.
Quick Customisations
The Quick Customisations section enables you to modify parts of your template without having to access the in-built editor.
Note: Apart from Terms and conditions, Quick Customizations applies to all types of transactions. This means that you can set different Terms & Conditions for each document type.
To ensure that the Quick Customisations appear in your template you will need to reference them using the following merge tags.
|
Field |
Description |
|---|---|
|
[LogoPath] |
Logo file path / URL |
|
[CompanyName] |
Company name |
|
[CompanyAddress] |
Company address |
|
[GSTRegNo] |
Tax GST number (Australia/NZ) |
|
[ABN] |
Company ABN number (Australia) |
|
[BankAccNo] |
Bank account number |
|
TAC] |
Terms and conditions |