Xact Link for ACT! and MYOB Install & Setup Guide
Installation
Installing XLAM locally
This is the easiest and most straightforward installation method. Simply ensure that ACT! is not running and then run the setup.exe file which will start the process of installing the XLAM client, follow the installation wizard till the end, make sure that XLAM is installing into the ACT! plugins directory and also ensure that your windows account has administrator privileges.
Once the installation is successful run your AccountRight program as a Windows Administrator and log in as you would normally (i.e. using your normal MYOB log in details), then run ACT! as a Windows Administrator and log in using an ACT! Administrator.
When you start ACT! for the first time after the install you will be presented with the end user license agreement which you must accept in order for XLAM to run.
Upon doing so you will be prompted to configure XLAM, you will be presented with the preferences screen which you can use to setup your connection to your MYOB AccountRight company file and test your connection settings.
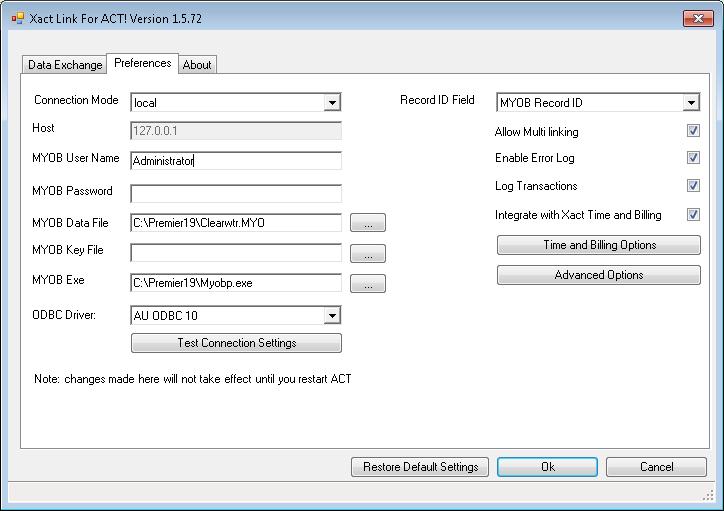
To connect to your AccountRight company file through a local connection you need to enter the following details:
- Connection mode: Make sure this is set to local, this will allow you to configure XLAM so that it can connect to your AccountRight data file directly.
- An AccountRight User name and password that you created earlier (i.e. the user called "ACT" - refer to the "Before Installation: Preparing your MYOB Database" section for more information). Remember, this must be a user with Administrator privileges.
- The location of the AccountRight data file.
- The location of your AccountRight executable, usually AccountRight is installed in a directory on your root drive with a name reflecting the version of AccountRight you are running (e.g. Plus19 Premier19 etc.) you can find the executable inside the installation folder.
- The correct version of the ODBC drivers which correspond to the version of MYOB AccountRight on the machine.
Once you’ve entered the above details you can click on the Test Connection Settings button to check if you can successfully connect to your Accounting data file.
If the connection is successful then you can proceed to the configuration section of this document.
Installing XLAM with IIS
Setting XLAM to connect to your AccountRight data file through IIS is process which involves the following steps:
- Installing and configuring the XLAM windows service
- Installing the XLAM web interface
- Installing and configuring the XLAM client
XLAM IIS setup explained
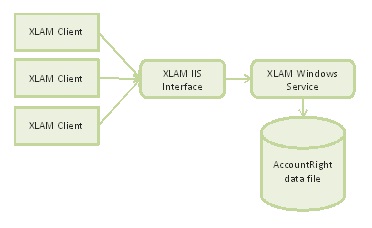
You can think of this setup scenario as a 3 tier client / server scenario, the windows service part ensures that there is always an open connection to the AccountRight data file, the web interface part acts as a connector between the windows service and the XLAM client running inside of ACT!.
The web interface part relies on IIS to handle load balancing and to manage multiple requests in an efficient and scalable manner, it also allows an administrator to configure the connection so that it can be secured and monitored if needed.
Setting up XLAM to run through IIS starts with installing and configuring the XLAM windows service. The XLAM windows service and the XLAM IIS interface must be installed on the machine where your AccountRight data file is located. To start the install process follow these steps:
- In the XLAM .zip package locate the folder called “IIS Setup components”
- Inside this folder you will find two .zip files, unzip the file called “XLAM Service” to a directory of your choice
-
Go to where you un-zipped the file above and locate the file Xact_LinkMServiceMgr.exe double click to run this file, you should be presented with a screen like the one below:
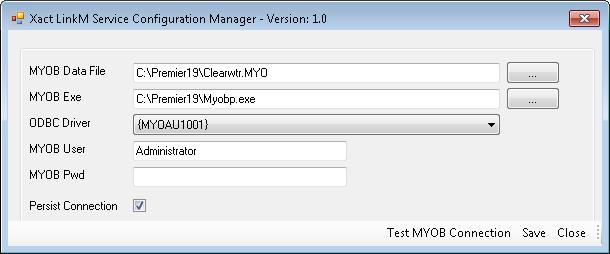
- Navigate to where your AccountRight data file is located and select it
- Navigate to where your AccountRight exe is located and select it
- Select the appropriate ODBC driver, if you don’t know which driver you have setup then you can cycle through the list of drivers and test each one accordingly (do this after you’ve enter the logon details to your AccountRight data file)
- Enter the AccountRight User name that you created earlier (i.e. the user called "ACT" - refer to the "Before Installation: Preparing your MYOB Database" section for more information). Remember, this must be a user with Administrator privileges
- It is highly recommended that you tick the Persist connection box as this will ensure optimum performance in heavy use scenarios
- Click the test connection button when done to check if your settings are correct, if so then click save and close the configuration manager
The next step is to register the XLAM windows service, to start the install process follow these steps:
-
While still in the same directory locate the files Xact_LinkMService.exe and InstallUtil.exe drag and drop the first file on top of the second one
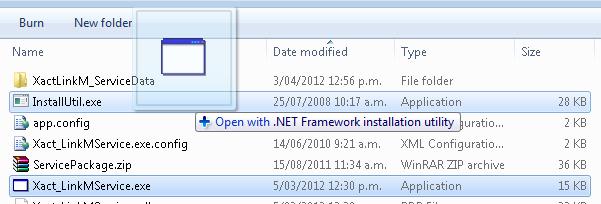
-
This will start the process of installing the XLAM windows service, if the installation is successful you will see a new windows service under the Services menu (Services.msc)
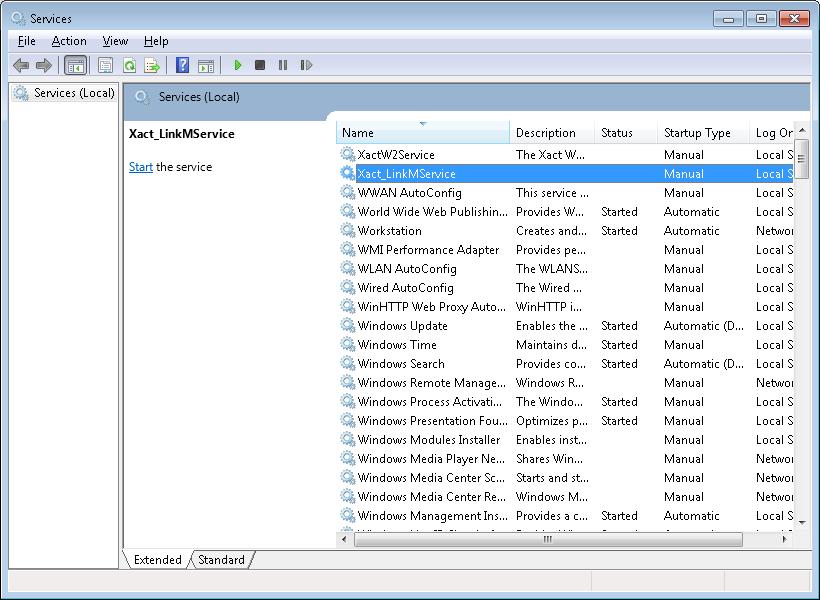
- You can configure the service to start automatically or manually, simply click Start to start the service; this will use the configuration settings you entered earlier to connect to your AccountRight data file
- Once the service has started you can move on to setup the IIS web interface
- Go back to the XLAM .zip package, go to the folder named “IIS Setup components” and locate the file called IIS Web Interface.zip
- Unzip this file to a directory called XactLinM under your IIS wwwroot folder (default is C:\Inetpub\wwwroot)
-
Start the IIS management console (InetMgr) and proceed to create a new web application called XactLinkM, make sure the web application is pointed to the folder created above
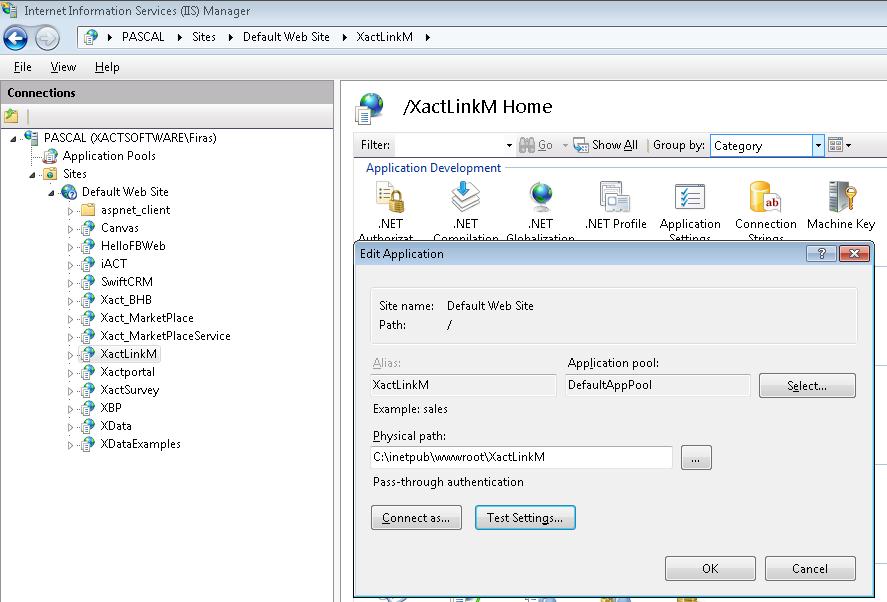
- Make sure you assign a 32 bit application pool to the XLAM IIS application and ensure that it can connect to the physical directory it is pointing to
- If your test connection is successful then you can check and see if the web interface can connect to the windows service, the easiest way to do this is to access the web application from a browser, if you are working on the server machine simply type this address into your web browser http://localhost/XactLinkM
- The above link assumes that you have setup the XactLinkM web application to run under the default website in IIS
If everything is working correctly then you should see a screen similar to the one below:
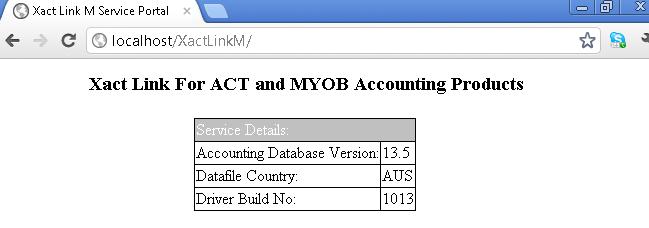
This is the Xact Link IIS interface home screen, it simply tells you that the XLAM IIS interface is running and is connected to the AccountRight data file.
From here we can proceed to the 3rd and final step which is installing the XLAM client, apply the following steps to each machine where you want ACT! to connect to your AccountRight data file:
- Make sure that ACT! is not running
- Download the XLAM installation package unzip to a location of your choice and run the setup.exe file
- Follow the installation instructions and ensure that the XLAM is installed into the ACT! plugins directory, once the installation is completed start ACT! and login to your database
- If you are installing XLAM for the first time you will be presented with the end user license agreement, you must read & accept the agreement in order to proceed with the setup process
-
You will be prompted to configure XLAM, the XLAM preferences screen will be displayed

- Make sure the connection mode is set to remote
- Enter the host address, it can be an IP address or a host name (e.g. http://MyServer/XactLinkM)
- Ensure you have the correct version of the ODBC drivers selected, they should correspond to the drivers which you selected early one when configuring the XLAM windows service
- When connecting through IIS you DO NOT need to have ODBC drivers installed on the client machines
- Click the Test connection button to check your settings, if the connection is successful then you can proceed to the configuring the link section
Installing XLAM with .Net Remoting
If you intend to use XLAM in a small workgroup scenario then using the .Net Remoting setup is the recommended option, this setup uses a simple client / server architecture where an application server is deployed and configured to connect to your AccountRight data file, once the server is setup client machines running ACT! & XLAM can be configured to connect to the server directly using the TCP/IP protocol.
The remoting setup involves the following steps:
- Setting up the remoting server application
- Setting up the XLAM client
To setup the remoting server application follow these steps:
- In the XLAM .zip file locate the folder “XLAM Remoting Server“, extract the contents of this folder to a directory on the machine where your AccountRight data file and application are installed.
-
Run the Xact_LinkMDesktopConnector.exe you will be presented with the following screen:
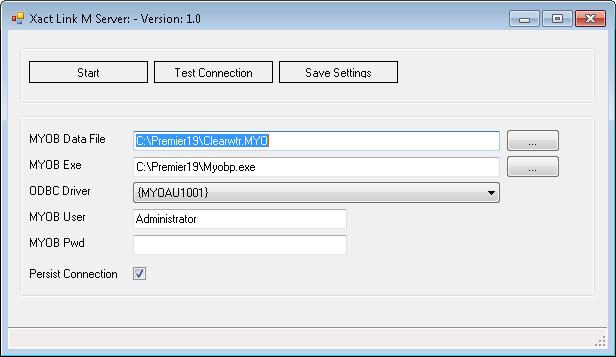
- Navigate to where your MYOB AccountRight data file is located and select it
- Navigate to where you MYOB AccountRight exe is located and select it
- Choose the appropriate ODBC driver
- Enter the AccountRight User name and password that you created earlier (i.e. the user called "ACT" - refer to the "Before Installation: Preparing your MYOB Database" section for more information). Remember, this must be a user with Administrator privileges
- It is highly recommended that you tick the Persist Connection box to ensure a fast and responsive experience
- Once all the settings have been entered, click on the Test button to test your connection settings, if the connections is successful, click on the Save button
- Once the server is setup you can start it by clicking on the Start button
From here we can proceed to the next step which is installing the XLAM client, apply the following steps to each machine where you want ACT! to connect to your AccountRight data file:
- Make sure that ACT! is not running
- Download the XLAM installation package unzip to a location of your choice and run the setup.exe file
- Follow the installation instructions and ensure that the XLAM is installed into the ACT! plugins directory, once the installation is completed start ACT! and login to your database
- If you are installing XLAM for the first time you will be presented with the end user license agreement, you must read & accept the agreement in order to proceed with the setup process
-
You will be prompted to configure XLAM, the XLAM preferences screen will be displayed:
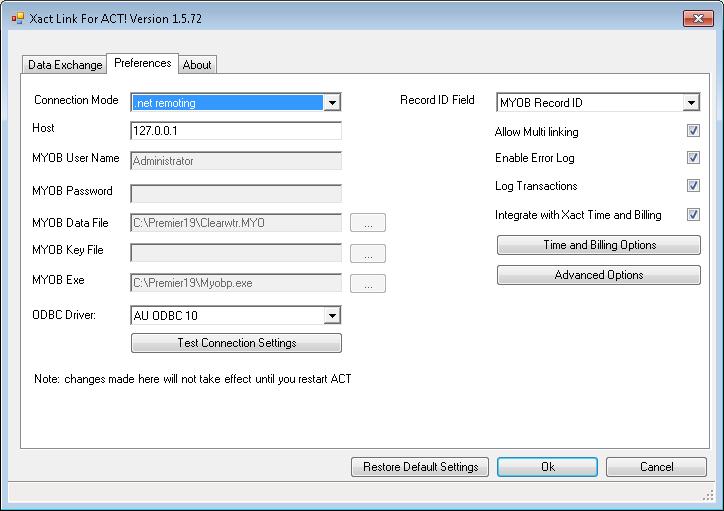
- Make sure the connection mode is set to .net remoting
- Enter the server / host IP address
- Ensure you have the correct version of the ODBC drivers selected, they should correspond to the drivers which you selected early one when configuring the XLAM windows service
- When connecting through IIS you DO NOT need to have ODBC drivers installed on the client machines
- Click the Test connection button to check your settings, if the connection is successful then you can proceed to the configuring the link section